My very own Pinterest Project!

The Back Story:

So I’m apparently “famous” for my intricately carved pumpkins that I do every year for the fall season.  The only catch?  They’re FAKE!!!  But the best part is that they will last year after year and no gutsy mess to clean up.  Its a win-win after you get over the price shock. I learned my rather clever technique when I was working as the Head Floral Designer for my local Michaels Arts & Crafts store.  The two fall seasons I worked there I couldn’t get any floral designs done because everyone wanted my pumpkins!  No they outsource the carving (BLAH!) and its sub-par for sure.  Darn laser cutters…

They are still one of my most popular items purchased in my Etsy shop: http://www.iwanciodesign.com And you can find them listed there from mid-August until the end of September if you ever end up wanting your own next year.  Since today is Halloween I thought this would be an appropriate blog post!

The Project: 

You will need (This project is only recommended to those trustworthy enough to use a knife that is VERY HOT):

Image

– A carve-able pumpkin from Michaels (All other ones are shat, so only get the Michaels ones)

– Walnut Hollow Versa Tool kit (You will need the knife tip for this project. You can purchase them at Michaels or here: http://www.craft-e-corner.com/p-115364-creative-versa-tool-kit-.aspx)

Insider Tip: For the LOVE OF ALL THAT IS HOLY…DO NOT attempt this project with an Exacto-Knife.  You will literally die of muscle fatigue, frustration, and all out chaos. That is all.

– Straight pin with a large head or safety pin

– Tape

– Stencil or printed lettering or photo

Before you start this project you’ll have to gauge the size of your pumpkin.  Michaels carries 3 different sizes: small, medium, and large.  Obviously you can put more lettering/designs on the bigger sizes.  A good shopping guide is depending on what will fit and the fact that  you won’t want to slice off your hands from it being too complicated.

Small: About 5 letters tops or a small traditional jack-o-lantern face. Lettering shouldn’t be more than 4 inches tall and should only fit in between the two seams on the pumpkin so that you can easily see the whole word/design.

Medium: This is my go-to size. This can fit up to 10 letters at about 3″ tall or less letters but they can be bigger.  At this size I can even carve some business logos into it.

Large: This is a great size for a centerpiece for a wedding to include the last name and date or both bride and groom’s names or address…whatever your heart desires.  I recommend this size if you are doing any larger logos.

Now that you know which size pumpkin you want you can go to your Cricut, Silhouette, or trusty computer and print out some lettering to fit.  Sometimes it takes some trial and error on size so I recommend using your computer so not to waste expensive materials.  Unless you’re a pro like me.

Image

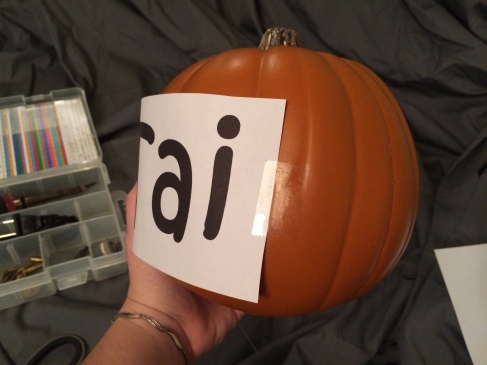
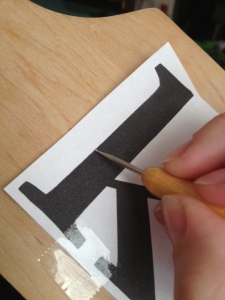
Trim the design down to size but leave about a 1/4″ border around it.  Find the middle of the pumpkin on the flattest side between the 2 seams and center the design. Tape that sucker down.  Trust me.

Image

Take your pin and start poking holes along the outline of the lettering. Its best to use a BOLD font for this because it makes the carving easier on you.  REMEMBER: Be CAREFUL of the letters that have closed off sections like Bs, Ds, Os and so on. You’ll need to make sure that you have a stem to hold that section in place.

Insider Tip: Use a pin with a LARGE head to make it more comfortable for you to use.  It makes the process go a lot faster and you not having teeny ouchy imprints on your finger.

Image

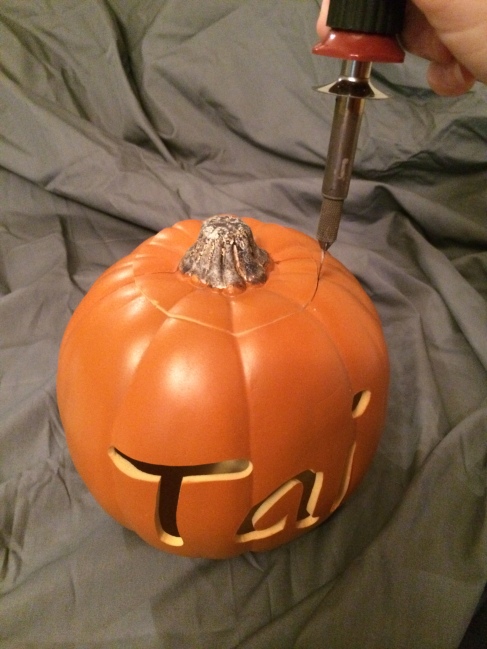
Now you play “Connect the Dots”! This is by far the longest and most tedious process.  PLEASE take your time cutting. The knife is VERY hot (believe me, its been tested…many times.  Ouchy.) and the pumpkins aren’t cheap.  I used to take 90 minutes to carve a basic pumpkin back when I started.  Now I’m down to about 10-30 minutes based on how intricate the design is. Of course I’ve lost count of how many hundreds I’ve done… You can start and stop but don’t hover in one place too long because the hot knife will melt the pumpkin.

Image

It its CRUCIAL to cut off the top LAST! If you do this part first it compromises the sturdiness of the pumpkin and makes it 100x harder to carve.  At this stage if some of your letters haven’t “popped out” yet you can stick your hand in there and help them along. You might have to go over some sections with your hot knife due to the fact that you didn’t penetrate the knife deep enough into the flesh (Had to just get a little scary for Halloween, right?). You can also go back and smooth out any jagged or uneven sections.

Image

Ta-da!  An everlasting pumpkin that looks so professionally done.  I can’t tell you how many guests and customers I’ve had ask me if the pumpkin was real.  Well…it technically is but not the seed-and-guts real, der. I highly recommend that these be placed on a covered porch or sheltered area if you want to keep them outside.  To get these to last for a long time (The pumpkin on the right is 4 years old and the one on the left is 3) keep them out of the weather. You can put in a battery-operated tea light, or clip-in light (You have to cut out a hole in the back for the light. These are the kind that clip into those ceramic houses at Christmas.), or a battery candle on a timer (HIGHLY recommend those!!!  No need to remember to go out and turn the candle on and off), or use a submersible tea light just in case water might get in the pumpkin (You can get them at Michaels in the wedding section or you can order them here: http://www.craft-e-corner.com/p-37802-submersible-tea-lights-3pkg-.aspx)

Here are just some other photos of completed pumpkins that I’ve done 🙂

ImageImageImageImageImageImage

A shelf made from…what?!?!?!

The Back Story:

So my husband has this amazing vintage and antique camera collection.  He’s had it just about as long as I’ve known him.  Now him being married to a picker, his collection has grown a bit faster when it was just him collecting.  With that its overgrown the shelf that they cameras were currently residing on.  My house is insanely small, I mean 3 is a crowd in this house, so I was limited on floor space and had to think of a clever idea to display these pieces of art and history.  Wall shelves maybe…?  Nah…that would require me to use power tools in which that’s a dangerous prospect.  What about a shelf?  Hmm…could work…  But shelves are insanely expensive and vintage shelving is hard to find since most of it goes for so cheap.  So…make my own…?   Perhaps…

The Inspiration:

Okay so a member of my vintage picking lovers anonymous page on Facebook (Okay so its not really named that but most days I feel it should be) posted a photo of this pin: http://www.pinterest.com/pin/204069426838884052/ (Follow me on Pinterest:http://www.pinterest.com/iwanciodesign)

Image

At the time I was thinking to myself “Okay, that’s pretty cool…”  I mean what the heck else are you going to do with those old crutches when you broke your leg at age 11?  So I filed it in my rusty ol’ brain for a rainy day, not thinking I’d ever do anything with it.  Well low and behold I found a pair of all wood crutches at Goodwill for $4.

Image

The Project:

So what you’re going to need for this project is:

– A saw (hand or power…although hubby has to handle the power one)

– Pair of crutches, 8′ long piece of wood that will fit between the crutch opening (size depends on crutches)

– 2 Wood dowels to fit through the adjustment holes

– Small hinge kit (I used a 1″ hinge that came with screws)

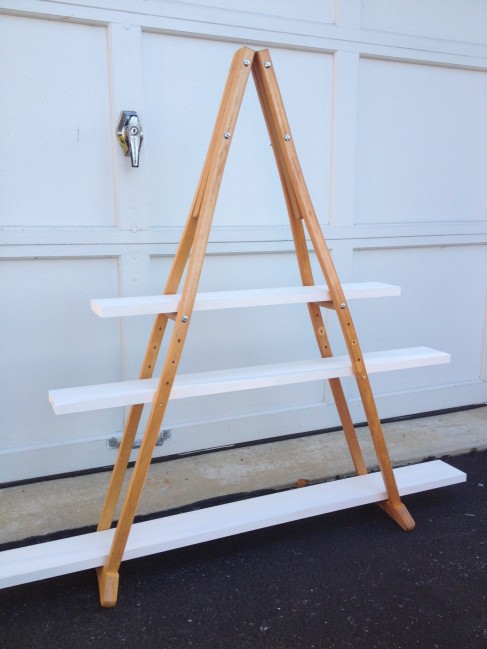
First thing is first…put those crutches on their highest setting and cut those leg suckers off!

b

Next attach the hinge.  Granted…its NOT an easy task to do this although now I know I was doing it the stupid way when I did it.  So please put these two sides together flat on the ground and then apply the hinge.  Doing it standing them up is NOT recommended.  Make sure you leave enough room in between each so you can easily move the hinge.

Image

Next cut to size the board for each of your shelves.  I had to go with a 3 3/4″ wide plank even though my crutches were 4″ apart, just because I didn’t have the right tool to cut a wider plank with (bummer).  This one was made of MDF and is already conveniently painted white (woot).  Now make sure you cut them from smallest to biggest sizes due to the fact that with the hinge the shelf will have an a-frame.  Having a large shelf on top will take some precarious balancing. I believe I cut it to 3.5′, 2.5′, and 1′.

Image

Cut to size your wooden dowels and put them up on the setting furthest from where you put the handle.  I put the handle all the way at the bottom (well what is now the top) and put the dowels in the last open rung.  The thicker your dowels the more weight your shelf can hold.  I decided not to try to drill through the heft of the crutch so I nixed the 4th shelf idea.

Image

Next add in your shelves!

Image

Make sure you take a bit of white paint and cover the cut sides of the MDF plank if you use the pre-painted one.

Image

Pretty snazzy.

Image

Now my hubby has a NICE place to display all his vintage cameras.  Forgive me on the awful lighting of the photo but the only place we had room for a narrow shelf was in our stairwell turn.  Doesn’t take up much space and gives guests something to look forward to dare they venture upstairs.  And it only took my husband walking past this two times to finally notice it.  A new record.

Image

Vintage Cutting Board Makeover

The Back Story:

As some of you readers may know…I LOVE vintage items.  Decor, jewelry, clothing…drives my mother nuts.  But I love how rich in history some items have, that they all tell a story of how our fads and tastes have evolved.  Plus most of these items were made in the USA from hard-working Americans that know quality when they see it.  Items from the past have survived so long because they were quality items, not built by mass machines.

Annnnyyyyhoooo…  Back on track here.  So in my picking travels I found this really neat vintage bread cutting board made out of thick butcher block.  She was $.99!  (As made famous in Macklemore’s “Thrift Shop”.  Hah!)  And a total blank canvas just begging for something to be made out of her.  She had some staining on the surface but I took care of that with some sanding.  See?  All pretty again!

2

The Inspiration:

So granted…I’m a vinyl letter snob.  Seriously, making your own sticker letters…whenever you want…whatever size you want…?  Cricut, I do love you even though your flashy expensive cartridges make me want a divorce.  But sometimes you want something that’s a little more “home made”.  Now granted, hand painting letters is the biggest pain in anyone’s patootey.  So how the heck DO you make those pretty letters when you hand paint and NOT use the ridiculously hilariously terrible stencils?  Well I dipped into my Pinterest board archives and found some tutorials to help me transfer lettering onto wood.  Because well…my way of thinking with Pinterest is, OF COURSE I will use that someday.

Thanks to ThatsMyLetter, I though I would give this pin a try: http://www.pinterest.com/pin/204069426836774562/ (Follow me on Pinterest: http://www.pinterest.com/iwanciodesign)

The Project:

So first step…is using your computer and word processing program and to print out lettering big enough to fill your projects.

TROUBLESHOOTING TIP: If you are a novice hand-painter or have bad eyesight I wouldn’t recommend any fonts that have a lot of detail or thin lines.  Please don’t torture yourself.

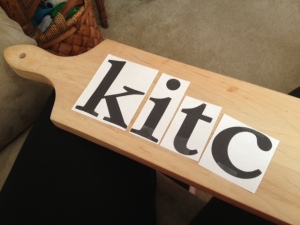
Microsoft Word is the devil and thought it would be “cool” to mess with the old spacing of letters and what not.  Boo hiss on you, Word.  I printed out my large letters and then cut out each letter individually to give my piece the look that I wanted sans the Word artistic aspect.  Obviously most of of you out there haven’t been using Word for as long as I have so you probably don’t have a grudge so you can skip the cutting step if you don’t have any frustrations to take out.  Tape the letters in place.

4

Now since I’m the “Crazy Insane Crafter That’s Tried Everything” I have this nifty embossing tool that has a beaded tip.  In the Pinterest blog post she uses a pen which normal people are bound to have in their house.  Take your time and trace the letters using a good bit of pressure to make an indentation into the wood.  You might want to pull up the paper a few times to make sure that you’re pressing hard enough for you to easily see the outline.

5

See the faint outline?  Its about 1/4″ to the left of the folded paper and my fingertips (OMG I need a manicure).  Keep tracing the letters with a firm pressure until you’ve completed them all.

6

So I raided my unending acrylic paint supply again (See, I told you it was handy to have that many colors on hand).  And found some black paint for a neutral look that is suited for any kitchen.  I chose a fine tipped brush, nothing too small or else you’ll be at this forever.

1

Now the neat thing about that whole lengthy process is that you now have outlined letters on your project piece without having to use icky transfer paper.  Plus if you pressed hard enough there is little “trenches” which makes painting the edges a little less excruciating.

7

Now you are welcome to clear coat your piece with acrylic spray paint or paint it down with some clear polyurethane to help protect it.  If you are using a cutting board, like me, I wouldn’t recommend it for food use unless you use a food-safe clear coat of protection.  I decided to leave mine as is.  If you so desire to hang your item you can purchase a picture hanging kit at a hardware store and hammer it on.  But anyway…ta-da!  Pretty professional, right?

8

Since my teeny little kitchen is fresh out of wall and decor space I put this little pretty up for sale in my Etsy shop: https://www.etsy.com/listing/163618549/miss-grace-vintage-cutting-board-sign

You’re also welcome to go shop around at some of my other vintage finds.  Comment below with your favorites and be sure to favorite my Etsy shop! http://www.wifeofwhimsy.etsy.com 

Fall into Decor

The Back Story:

I am completely and utterly in love with the season of fall.  I was born in the spring but should always have been a fall baby.  I got married in the fall, had my son in the fall, and even my husband’s birthday is in the fall.  I pretty much narrowed fall down to my favorite season pretty quickly in life.

Spring: Yes its my birthday season but I’m ghastly allergic to just about anything that grows and gives off pollen.  So from March-May I’m usually sneezing my head off.  That was an easy X.

Winter: I LOVE being outside and seeing things green or colorful.  Winter is always depressing when literally your whole environment is dead.  I’m okay with winter until about the first big snow storm and after New Years, but after that its -gag-.  Another season crossed off.

Summer: I am absolutely in LOVE with the beach.  I love the smell, I love the sounds, I love the looks, but I loathe the heat.  If I could live in the endless summer of 80 degree weather in Hawaii, I would in a heartbeat.  Plus I spent a summer of college years working at a local amusement park which pretty much sealed the deal for me hating the heat.  2nd place.

So by process of elimination, fall is my favorite.  And well…I love fall decor!

The Inspiration:

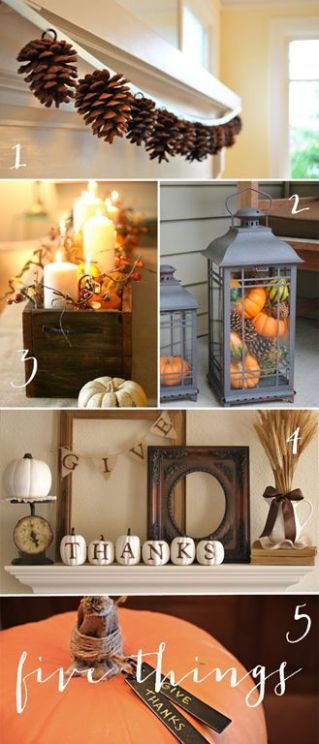
So this pin on Pinterest (Follow me: http://www.pinterest.com/iwanciodesign) actually inspired at least 2 blog posts so far.  And I was actually inspired to combine two of the photos in the collage below for this project. I’ll be using this one in another post in the near future.  Who knows, it might be the post right after this one.  I’ll leave you in suspense.

Image

Pin: http://www.pinterest.com/pin/204069426838565464/ (Thanks Inshoper) So anyway, I bet your’re just dying to know what crazy thing I figured out this time.

The Project:

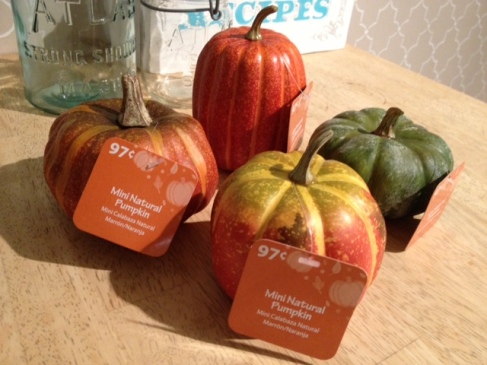
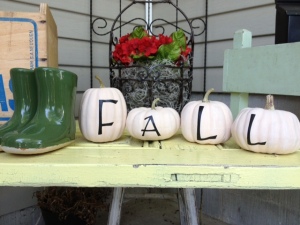
So I found this pin and just absolutely fell in love with the idea of picture #4.  The pumpkins with the word “Thanks” with each letter on a separate pumpkin just be-stilled my heart. So I did some “soul searching” and found these cutie but oh-so-fake looking pumpkins for $.97.  I got 4 to spell out “Fall” since well…you know…I’m frugal and all and didn’t want to shell out $2 more if I didn’t have to.

Image

In line with my last posting about my glue stash (https://wifeofwhimsy.wordpress.com/2013/09/15/first-project-the-faux-apothecary-jar/) I also have an obscene amount of acrylic paint in my house.  I always forget what colors I have since they’re spread out in 3 places in my home.  So by now I probably have enough to paint my kid’s room in a vomit of acrylic color (Thankfully they’re only $.50-$1 a bottle).  Anyway, I raided my stash and found 2-3 shades of cream paint to transform these foam pumpkins.

TROUBLESHOOTING TIP: Please please please…for the love of God DO NOT spray paint foam pumpkins.  Most of the time spray paint will eat away at the surface and you’ll have a pumpkin that looks like it was devoured by termites.

Image

I find painting to be very relaxing (Not painting whole rooms mind you…  Whoever finds that relaxing has never felt pain in their life) so I spent about an hour adding 3-4 coats of my lighter cream base coat to cover the orange and green.

Image

Now for those of you that are feeling “artistic” you can brush on a cream or tan color about 2 shades lighter than your base color to give your pumpkin a more realistic look.

INSIDER TIP: Lightly fill your brush with paint and brush on about 2-3 long strokes.  Take a dry paper towel and lightly wipe off some of the excess paint.  It doesn’t matter if it looks streaky, just as long as it looks a little more natural than a painted foam pumpkin.

Image

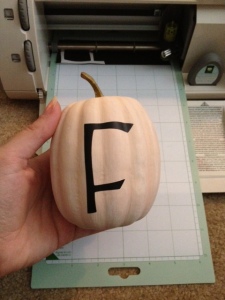
Now like most of you I went through a stage of “How-the-heck-do-they-make-those-letters-so-nice?” contemplation until I broke down and invested in a Cricut during a Black Friday special.  These vinyl-and-other-things cutting machine is amazing for the mid-to-heavy-duty crafters.  I used to use mine for scrapbooking but since a tiny human has now encompassed all my crafting time I mostly use it to cut out letters in fun fonts.  I just cut a scrap piece of black vinyl (Its actually chalkboard vinyl from Michaels, its cheaper than buying online), set it on the sticky board, set the machine, and let her cut.

INSIDER TIP: If making the investment in a vinyl cutting machine, please spend a little more and invest in a Silhouette.  You can do SO MUCH MORE with it and don’t have to buy those annoying cartridges.  But for those of you that aren’t computer-literate I would go with the Cricut since everything you need to do is based through the machine.

5


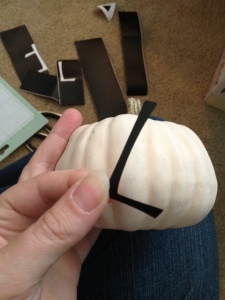
Now I know some of you probably don’t have a cutting machine of any sort.  So your options are one of two things: 1. Paint the letters on Or 2. Use stickers.  Obviously the latter is MUCH easier and less of an eye-gouging experience.  You can pick up some of the larger alphabet stickers either in the kids craft section (with the posterboards and school project supplies) or in the scrapbooking department.  You can choose stickers or rub-ons but stickers are a lot less of a headache.  So now that you have your vinyl/sticker/whatever ready line it up gingerly on the pumpkin and press down.  Just lightly press down on the sticker until you have the placement you want.  Then you can smooth it down firmly with your finger.

6


Ta-da!  Looks purdy doesn’t it?  And from far away it looks hand-painted!  Your friends will be jealous.

7

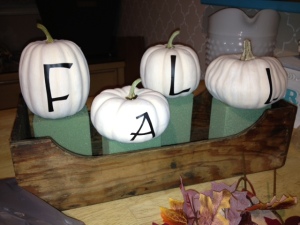
So now that all the pumpkins have letters on them its time for a photo shoot!  Good thing pumpkins are such good models.

8


Now originally I was going to put these on varying height candle sticks buuuuuuuuuuuuuuutttt of course I don’t have any that would look fitting enough for this display.  AND (the BIG and) my beautiful, oh-so-beautiful fireplace mantle is currently being over run by my husband’s insane collection of electronic items.  Apparently they’re decorative accessories to him and deserve to be placed on my mantle.  Yeah.  Right.

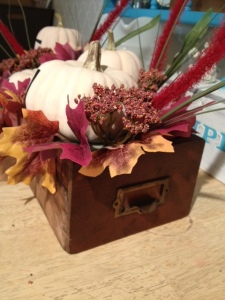
Anyhoo…so I tried to brainstorm a little on Pinterest and low and behold the same pin inspired an idea on how to display my pumpkins.  I had found a beautiful old library card catalog drawer that was stashed in my grandparent’s basement.  It was leftover from a work bench project my Gramps had created YEARS ago (made a work table out of scrap wood and made a little shelf and used these drawers as well, drawers for his small mechanical parts. Can you tell where I got my craftiness from?).  I took one home with me and stashed it away for a future project.  But in my musings about how to display these pumpkins, the proverbial light bulb blinked on above my head.  So yes I headed back to my favorite place: Dollar Tree, and picked up some green craft foam and about 5 fall floral bushes.  $6 to turn this into something amazing.

9


Dollar Tree thankfully randomly has a block of green floral foam (INSIDER TIP: Always always ALWAYS choose the GREEN floral foam – not the wet floral green foam. Its the BEST for floral design but its very messy to cut) that’s already cut up into 4 squares.  Perfect.  Less work for me.  I cut the foam down just a tad to give the pumpkins varying heights.  (INSIDER TIP: Cut foam outside or over the trash with a smooth edge knife or metal putty knife or icing spatula)  I used wire cutters to cut down the floral bushes to about 3-4″ picks and stuck them in the foam.  I highly recommend hot gluing everything if you would like it to last.  I didn’t want to mess up the pumpkins or the drawer, just in case I wanted to use it on a future project.

11


Sure turned out purdy, didn’t it?  Only cost me about $10 to make!  Sadly I had to find a place of less prominence for her in my entry hallway instead of being able to bask in all its crafty glory on my mantle.

10


First Project! The Faux Apothecary Jar

Okay so I’ve been a busy little bee scouring my unending Pinterest boards and finding some projects to work on.  I thought I would start with something fairly simple (I’ll go with the word simple since not everything crafty is easy for everyone!).

One of the main things you should know about me is that I am FRUGAL when it comes to home decor and crafting.  Big $$$ price tags on crafting supplies sends me running for the hills (or my coupon stash).  This chic project I completed for $1.50 (YES I SAID ONE DOLLAR AND FIFTY CENTS) while “designer” ones of these pretties are going for $15-$150!

The Back Story:

I’ve been wanting DESPERATELY to update my laundry closet.  The organizing in there is so blah and its all so boring.  I need to spice it up!  But that will be another blog post in the FAR future…  Anyway, I was visiting my Grams’ house a few weeks ago and looking through all her amazing vintage treasures.  I wish she was still with us so I could know the history of each piece that she had stashed away.  So I found some amazing vintage/antique clothespins!

The Inspiration:

f

Pin: http://www.pinterest.com/pin/204069426834746755/ Thank you Decorchick! (Follow me on Pinterest!: http://www.pinterest.com/iwanciodesign)

This was one of my earliest pins EVER (And I have over 4000 pins last time I checked…) and I thought it was such a clever and very elegant idea!  Decorchick! created hers from a Dollar Tree vase, Dollar Tree candleholder, and adhesive rhinestone charms from Hobby Lobby for her daughter’s birthday party.

My Project:

So I found this sad looking apothecary jar without its lid for just $.49 at my local Salvation Army.  It has pretty curves and was a good size so for 2 quarters it had to be good for something.

b

Dollar Tree is a crafters and do-it-yourselfers DREAM WORLD where everything is CHEAP but oh-so-awesome.  Every Dollar Tree has a bunch of these glass candle holders for, you guessed it, $1. So I picked one up for the “legs” of my faux apothecary jar.

c

Next we had to get these two glass beauties hitched.  I probably have more crafting glue options than you would care to imagine…probably enough to glue to my 2 year old toddler to the ceiling.  I raided my stash and found some Elmer’s China & Glass Cement.  I put a fairly generous helping around the rim of the candle holder (the part where you stick the candle into), but be careful because this glue is VERY watery so take your time applying.  You don’t have to be in a rush due to the slow drying process. I turned the jar upside down to place the candle holder on the bottom to eye up the placement easier.  This glue unfortunately takes about 12 hours to cure so I was impatiently waiting.  I recommend using E6000 for this project as well.  That stuff is a BEAST.  But this Elmers stuff did the trick and dried clear as raindrops.  I applied a 2nd coat around the edge of the candlestick and let it dry once again.

a

Tada! Here is my pretty little lady that only cost me $1.49 to make.  Super cute and super cheap AND super easy, right?

d

Of course I had to let her have her own modeling session, complete with vintage clothespins!  One day she’ll sit perched on a shelf in my laundry closet for use on my indoor clothes line.  One day…

e

Howdy!

Image

Howdy, all!  First off, my name is K, and I’m starting this blog adventure as a way to share some of the ideas that pop into my noggin’ or my take on some projects that I’ve found online that tickled my fancy.  I’ve been in the crafting and design business for over a decade now and one thing I learned about myself (and well…others) is that…

ITS NOT NICE TO COPY PEOPLE.

Yes in some forms imitation is flattery.  But not EXACT imitation.  As an artist I kind of find it disheartening that people have to use others’ ideas and claim it as their own.

Well let me tell you something.

I’m not that kind of person!  My favorite crafting ability is that in which I’m able to take an idea and put my own little twist on it.  Whether its taking a basic idea and jumping off of a cliff with it or adding my own personal touch.  That way I’m not copying anyone’s good ideas, just making them suit me.

So sit down, buckle up, maybe make a stiff drink while your at it…and come along for the ride 🙂